How to Use Saphir Renovateur | Cream Guide for Shoes, Bags & Jackets
A Thin Coat, Three Minutes, Then Buff
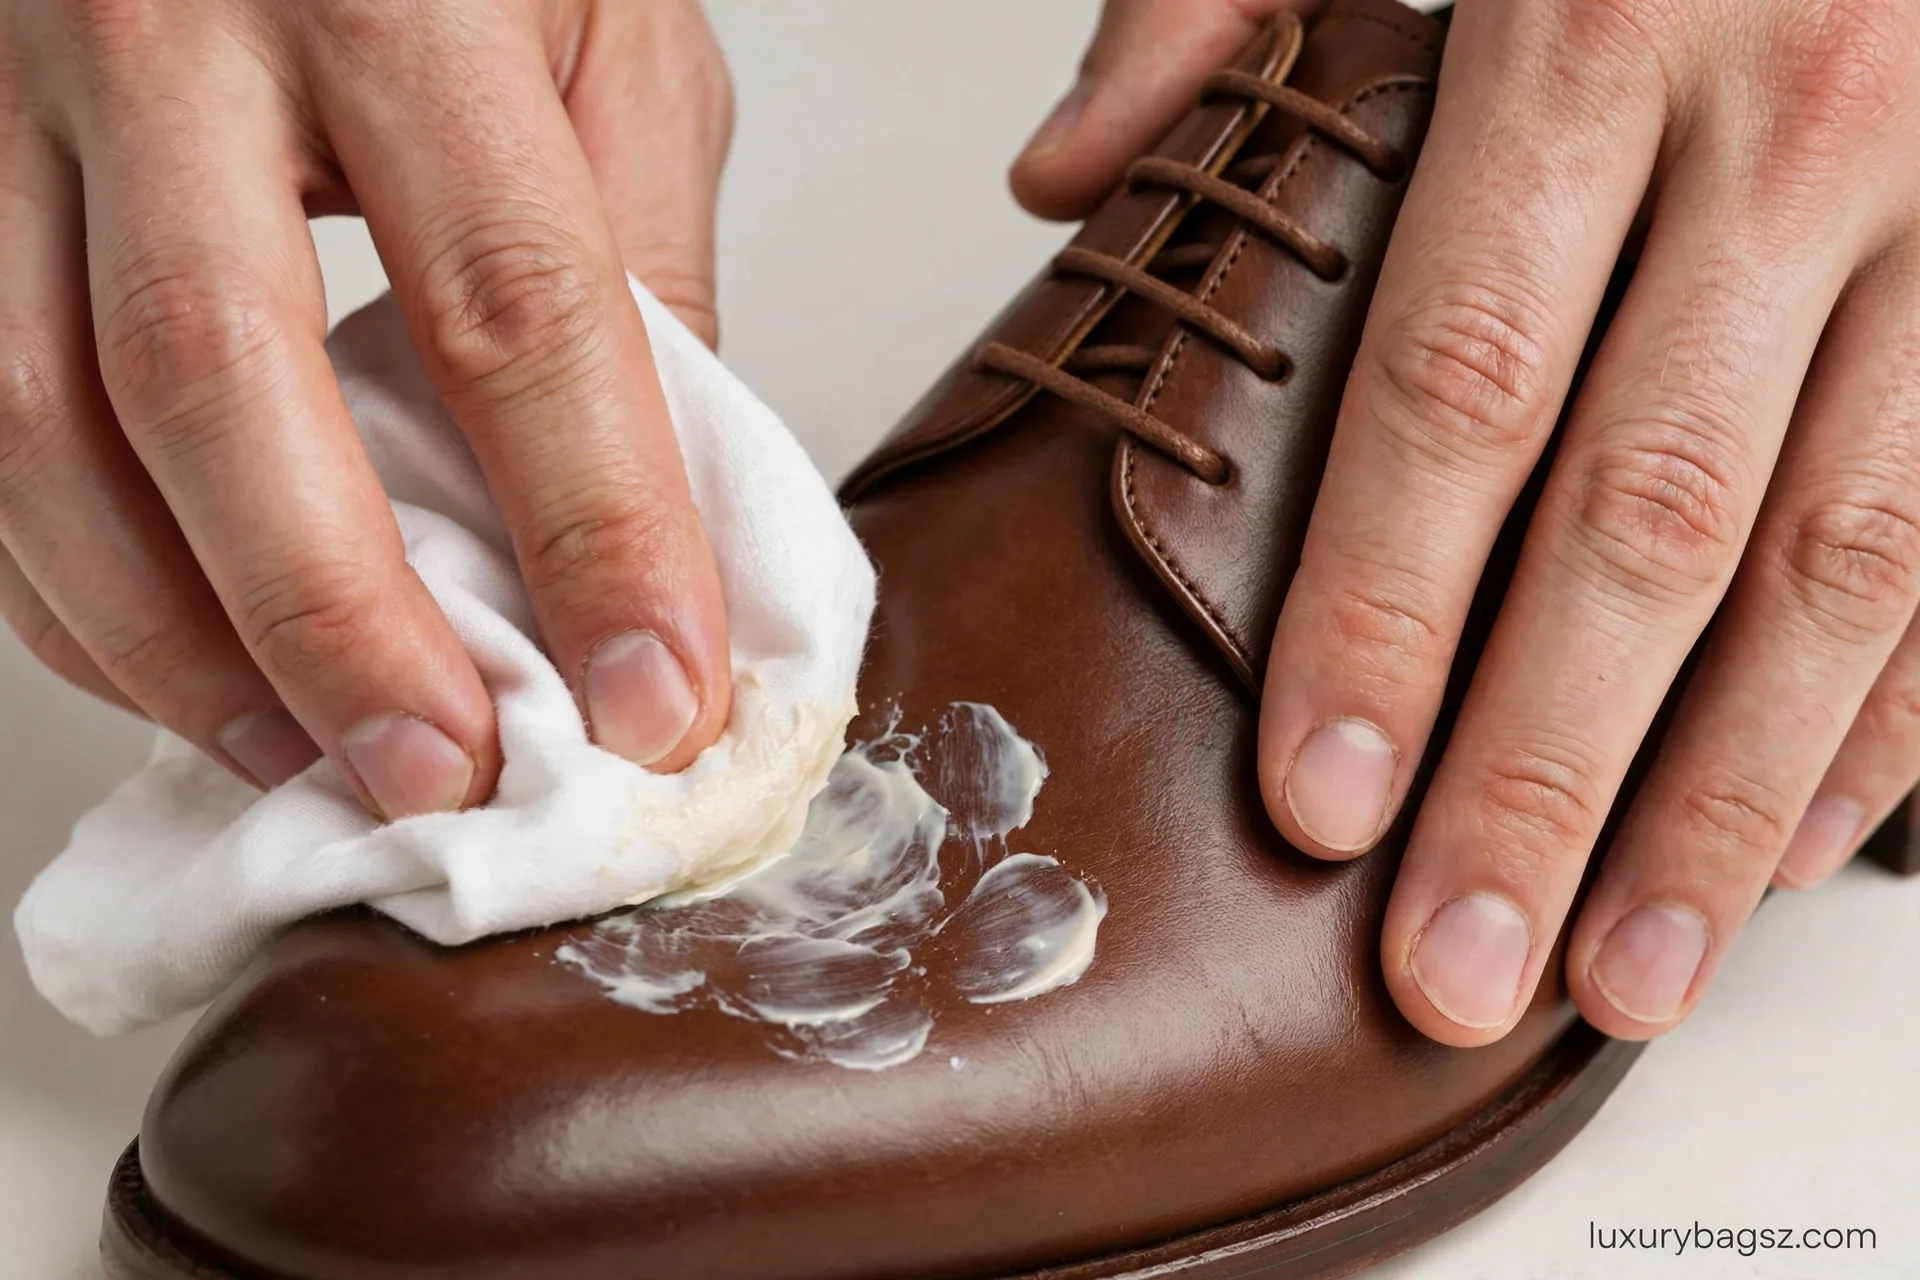
Brush the item clean, spot-test a hidden area, then apply a pea- to dime-sized amount with a white cotton cloth in small circles, spreading one thin, even coat wide before adding further dabs. That starting amount, about 1 to 2 ml, is enough to cover first.
Leave it for at least three minutes so the oils can sink in, then buff with a soft cloth or a horsehair brush. If the leather still absorbs quickly, repeat with another thin coat, and stop once uptake slows and the surface feels faintly tacky.
Use the jar cream only on smooth leather, for shoes, bags and jackets alike. Suede and nubuck need the spray version instead, and the cream must never touch patent leather, fabric or soles.
Saphir Renovateur is the leather conditioner that serious shoe, bag, and jacket owners keep coming back to. Used correctly, it gently cleans smooth leather, replenishes its oils, and leaves a soft, natural shine — without changing the colour. Used incorrectly, it can leave a sticky, greasy layer that attracts dirt, darken light leather, or — worst of all — ruin suede that should never have touched a cream in the first place.
This guide shows you how to use it correctly, step by step, for shoes, bags, and jackets. It also clears up the naming confusion, resolves the conflicting drying times and amounts you will find online, and tells you plainly what Renovateur will not do: it will not restore lost colour, it will not remove stubborn stains, and on its own it will not protect leather from water.
This guide is general information only. It is not affiliated with, endorsed by, or sponsored by Saphir. Always spot-test first, and follow the instructions on your own jar, because formulations and guidance can change.
Key Takeaways
- Buy the right Renovateur: the cream in the jar is for smooth leather. The spray is a different product, for suede and nubuck.
- Renovateur is a neutral, pigment-free cleaner and conditioner. It will not change colour, and it will not restore lost colour.
- Thin layer, a little goes a long way: start with a pea- to dime-sized amount, spread it wide first, and add small dabs only until one even coat covers the item.
- Spot-test on a hidden area first, especially on light colours, aniline leather, and vintage items.
- Dry for at least 3 minutes before buffing. Longer is better for dry leather. Overnight is optional, not required.
- Stop when uptake slows and the surface feels slightly sticky. That means the leather is thoroughly conditioned.
- Renovateur alone does not protect leather. For protection and shine, follow it with a cream polish and, if you want, a wax polish.
- Never use the cream on suede, nubuck, patent-coated leather, fabric, or soles.
The Short Answer
What is Saphir Renovateur?
A water-based, neutral cleaner and conditioner cream for smooth leather, made with mink oil, lanolin, and beeswax, with no silicone or resin. Its mild cleaning agents dissolve old polish and dirt so the conditioning oils can penetrate deeper.
How do you use it, in one paragraph?
Brush the item clean, remove laces and insert shoe trees if it is a shoe, spot-test on a hidden area, apply a thin layer in small circles with a white cotton cloth, let it dry for at least 3 minutes, then buff with a soft cloth or horsehair brush. If the leather is still thirsty, add one more thin coat and repeat. That is the whole method. The rest of this guide is about getting each step right, and knowing when not to use it at all.
What should you not expect?
Colour restoration, stain removal, or waterproofing. If you need colour, you need a pigmented cream after Renovateur. If you need stain removal, you need a proper cleaner first. If you need protection, you need a follow-up product. Renovateur is the conditioning step, not the whole routine.
Which Renovateur? — Don’t Buy the Wrong One
This is the most common mistake, and it happens before you even open the jar.
| Product | What it is | Use it on | Do NOT use it on |
|---|---|---|---|
| Renovateur cream (Médaille d’Or / Beauté du Cuir) | Cream in a jar, for smooth leather | Smooth calf, box calf, goat, cordovan, grain leather — shoes, bags, jackets, belts | Suede, nubuck, patent, fabric |
| Renovateur spray (suede / nubuck) | Spray, for suede and nubuck | Suede and nubuck shoes and bags, to revive colour and condition the nap | Smooth leather |
| Renovateur Macadamia | A variant of the cream | Smooth leather, as per the cream | Suede, nubuck, patent, fabric |
| Crème Renovatrice | A different Saphir product, for scuffs | Scratched or scuffed leather, to restore grain and reduce signs of wear | As a general conditioner — that is Renovateur’s job |
If your item is suede, stop here and use the suede guide instead. For how to brush and care for suede without flattening the nap or using the wrong product, see suede brush. The cream in this guide will get caught in suede nap, darken it, and ruin the texture. That is not a risk worth taking to save a separate purchase.
Similarly, if your item is a canvas or non-leather gift tote, Renovateur cream is not for it either. A canvas VIP-style tote is not a smooth leather handbag, and treating it like one will not help it. For what those gift bags actually are, and how to tell a real leather handbag from a gift item, see VIP gift bags.
For the rest of this guide, “Renovateur” means the cream, unless the spray is named explicitly.

What’s in It, and Why It Works
Leather is animal skin. Over time, wear, cleaning, water, and heat strip its natural oils. When those oils go, the fibres dry out, stiffen, and eventually crack. A conditioner replenishes those oils so the fibres stay flexible and the bonds between them stay strong.
Renovateur does this with:
- Mink oil — deeply penetrating, and more shelf-stable than many other animal fats. This is the main conditioning ingredient, and the reason Renovateur is expensive compared with creams like Venetian Shoe Cream.
- Lanolin — softens and nourishes.
- Beeswax — gives a soft, natural shine and a light surface finish.
- Water-based formula, no silicone, no resin — this matters. Silicone and resin are stable compounds that can last for years without degrading. They build up on the surface, clog pores, create a barrier, and stop later products from sinking in. Renovateur does not do that, which is why it is used as a base coat before other polishes: it opens the pores rather than sealing them shut.
One plain note: mink oil is animal-derived. That matters to some buyers, and it is part of why Renovateur costs more. This guide states that fact and moves on — it does not recommend for or against animal-derived products, and it does not claim a vegan alternative works the same way, because that claim was not verified.
Renovateur is neutral, meaning pigment-free. It will not change the colour of your leather, and it will not add colour back where colour has worn away. If you want colour, you need a pigmented cream polish after Renovateur — Saphir Crème 1925 or Pommadier, matched to your leather colour. Expecting Renovateur alone to restore colour is the second most common disappointment with this product, after the suede mistake.
Tools and Prep
You do not need much, but you do need the right things, in the right order.
Tools:
- Horsehair brush, for dust and for buffing.
- White cotton cloth, for application and buffing. White matters: you can see colour transfer on it, which tells you old polish is dissolving. A coloured cloth hides that signal.
- Soft polishing cloth or wool glove, for the final buff.
- Shoe trees, for shoes.
- Gloves, optional. One retailer recommends gloves when applying conditioning creams. Others apply with a cloth or even a finger. Gloves keep the cream off your hands and keep hand oils off the leather. They are not required, but they are sensible if you dislike the feel of the cream.
Prep, for shoes:
- Remove the laces.
- Insert shoe trees, so the leather holds its shape while you work.
- Brush the whole shoe with a horsehair brush to remove dust and surface dirt.
- If the shoe is dirty or clogged with old wax, silicone, or resin deposits, clean it first. Saphir recommends Reno’Mat / Reno Cleaner for this step. Do not apply Renovateur over a clogged, dirty surface and expect it to work — dirt trapped under conditioner becomes a dull layer, and wax build-up stops the oils from penetrating.
Prep, for bags and jackets:
- Empty the bag completely. Remove anything from pockets.
- Brush or wipe the surface clean with a dry, soft cloth.
- For a jacket, hang it so panels hang flat and seams are accessible. Do not work on a jacket bunched up on a chair.
- For any item, find a hidden area for the spot test — inside a bag flap, under a shoe tongue, inside a jacket hem.
Spot test — do not skip this:
Apply a tiny amount to the hidden area, let it dry, and buff it. Check for colour change, darkening, stickiness, or finish change. This matters most on light colours, aniline leather (which has no heavy surface coating), and vintage items, where the finish may already be fragile. If colour keeps coming off on the cloth, or the finish changes in a way you do not want, stop. Do not keep rubbing and hope it settles.
Step by Step — The Method
This is the core method, for shoes, bags, and jackets alike. Item-specific notes follow in Section 7.
Step 1: Brush and clean
Brush the item to remove dust and dirt. If it is dirty or clogged, clean it first with a proper leather cleaner, let it air dry naturally, and brush again. Never use heat or direct sunlight to speed drying — heat dries leather out, which is the opposite of what conditioning is for.
Step 2: Take a small amount
Take a pea- to dime-sized amount of Renovateur on your white cotton cloth. That is about 1–2ml. One guide describes a dab about 1cm in diameter, enough to cover almost half a shoe. All of these amounts mean the same thing: a little goes a long way, because Renovateur is rich.
Wrap the cloth around a few fingers so you can control how much product you are using. Do not scoop a large blob and hope to spread it thin later. It is far easier to add a second small dab than to remove excess cream.
Step 3: Spread wide first, then work it in
Spread the dab over a large area first, in small, quick circles, before working it into the leather. This gives a more even application than dabbing it in one spot and rubbing hard.
Then work the cream evenly into the leather with light to medium pressure, in small concentric circles, until the whole item has one thin, even coat. Do not forget the tongue on a shoe, the folds and edges on a bag, or the seams and panels on a jacket. Those are the areas that dry out first and crack first.

While you apply, you may notice colour rubbing off on your cloth. This is usually normal: Renovateur’s mild cleaner is dissolving old polish so the oils can penetrate deeper. It is not, on its own, a sign of damage. But if colour keeps coming off heavily, or the leather underneath looks lighter or patchy, stop and re-check your spot test. There is a difference between old polish dissolving and dye lifting, and the spot test is how you tell them apart.
Step 4: Let it dry
Let it dry for at least 3 minutes, as Saphir instructs. See Section 6 for the full drying-time discussion, but the minimum rule is simple: do not buff, do not polish over it, and do not wear the item until it has dried and been buffed.
Step 5: Buff
Buff with a soft cotton cloth, wool glove, or horsehair brush, using light pressure and smooth motions. This removes excess Renovateur and brings up a soft, natural shine. If you had existing wax on the shoe, you may notice it shines nicely after buffing — that is because Renovateur dissolved some of the old wax, which is then buffed into a shine.

Step 6: Check, and add one more thin coat only if needed
After buffing, check the leather. Is it supple, even, and softly shining? Then you are done. Is it still dry, matte, or thirsty in places — creases, toes, heels, bag corners? Then add one more thin coat, let it dry, and buff again.
The test ShoeTree Project gives is the best one in any guide checked: keep applying thin coats until you notice that uptake slows down and the surface starts to feel slightly sticky. At that point the leather is thoroughly conditioned. Stop there. More cream after that point does not condition more — it just sits on the surface, stays sticky, and attracts dirt.
Drying Time, Resolved — Why Guides Disagree
If you search for Renovateur drying time, you will find four different answers, and they all look authoritative:
- Saphir official: at least 3 minutes before polishing.
- Brick + Mortar: 30 minutes to absorb and dry, then brush to shine.
- LeatherEK: 5–10 minutes, away from sunlight or heat.
- ShoeTree Project: overnight, then brush.
They are not all wrong. They are answering different questions.
3 minutes is the minimum before buffing. That is Saphir’s own instruction, and it is the safe minimum to quote. If you buff sooner, you wipe off cream that has not yet penetrated.

Longer is better for dry or thirsty leather. A very dry shoe, bag, or jacket will take longer to absorb a coat, and giving it 30 minutes — or even longer — lets the oils penetrate properly. Brick + Mortar’s 30 minutes is a sensible working time for a first coat on dry leather, not a contradiction of Saphir’s minimum.
Overnight is optional, not required. Leaving Renovateur overnight, as ShoeTree suggests, will not harm smooth leather, and it is a convenient way to ensure full absorption on a very dry item. But it is not necessary for routine conditioning, and you should not feel you have done it wrong if you buff after 10 or 30 minutes and the leather looks and feels right.
What you must not do: do not use heat, a hairdryer, or direct sunlight to speed drying. Heat drives oils out and dries leather, which defeats the purpose. Do not wear the item before buffing, or you will transfer cream to socks, clothes, and anything the item touches.
So the rule for your routine is: minimum 3 minutes, longer for dry leather, overnight only if you want it, and always buff before wearing or using the item.
By Item — Shoes, Bags, Jackets, and Belts
Shoes
Shoes are where Renovateur is most used, and where the routine is most developed. For a full dress-shoe routine — what counts as a dress shoe, how to choose a first pair, and how care fits into ownership — see dress shoes.
- Remove laces, insert shoe trees, brush, clean if needed, then Renovateur as in Section 5.
- Condition the tongue as well as the uppers. The tongue dries out, creases, and cracks just like the rest of the shoe, and it is the part most guides forget.
- Pay attention to creases, toes, and heels — the stiff areas where leather is worked hardest.
- After Renovateur, you can stop there for a soft, natural finish, or continue with a pigmented cream for colour and a wax polish for shine. See Section 9.
- For suede shoes, do not use this cream at all. Use the suede routine instead: suede brush.

Bags
Bags need the same method, with three extra warnings that shoe guides never mention.
- Handles first, but gently. Handles are the most handled part of a bag, and the most likely to be dry, darkened, or worn. Condition them, but do not overload them — excess cream on a handle transfers to hands and clothes.
- Corners and edges second. Bag corners rub, scuff, and dry out. A thin coat on corners, worked in carefully, helps more than a thick coat slapped over the whole bag.
- Hardware and lining: do not touch. Do not apply Renovateur to metal hardware, clasps, chains, or zippers, and never to the inside lining. Renovateur is for smooth leather surfaces only. Wipe hardware with a dry cloth only, and keep cream off stitching where you can — excess cream in stitching attracts dirt and can darken thread.
For general leather-bag care principles — dry-first cleaning, spot-testing, light-colour care, hardware and interior care, and storage — the same logic that applies to smooth leather bags applies here, even though the item is different. See clean Chanel bags for the full bag-care version of those principles, including what not to do with alcohol, harsh cleaners, and heat.
For vintage or quilted leather bags, be extra careful with the spot test. Vintage leather may have a fragile finish, and quilted leather has stitching and padding that can trap excess cream. A thin coat, a hidden-area test, and patience matter more than speed. For what to look for in a vintage quilted bag — condition grading, white hardware discolouration, lining wear, and conflicting material claims — see Cambon bag.
Jackets
Jackets are the largest smooth-leather item most people own, and the easiest to condition unevenly.
- Hang the jacket flat, work panel by panel, and keep your coats thin and even. A thick coat on one panel and a thin coat on the next will show as patchiness after buffing.
- Pay attention to seams, elbows, and shoulders — the areas that flex and dry out.
- Test a large hidden area first, such as inside a hem or under a collar, because a jacket shows uneven conditioning more obviously than a shoe does.
- Let the jacket air dry fully before wearing it, and buff every panel. An unbuffed jacket will transfer cream to anything it touches.
Belts and small leather goods
Belts, wallets, and small accessories follow the same method, in miniature. Use even less product — a pea-sized amount may be too much for a wallet — and buff thoroughly, because small items are handled constantly and excess cream transfers immediately.
By Leather — What It Works On, and What It Doesn’t
| Leather | Renovateur cream? | Notes |
|---|---|---|
| Smooth calf, box calf | Yes | The core use case. Thin coat, spot-test on light colours. |
| Goat | Yes | Saphir lists goat as suitable. Same method as calf. |
| Cordovan (shell cordovan) | Yes, with care | Saphir lists cordovan as suitable, but cordovan is dense and glossy. Use less product, brush well, and do not expect the same absorption as calf. |
| Grain leather | Yes | Same method. Work cream into the grain, do not overload it. |
| Vegetable-tanned smooth leather | Yes | Suitable, but vegetable-tanned leather can darken with oils. Spot-test is essential, especially on natural, undyed vegetable-tanned leather. |
| Aniline leather | Yes, with extra caution | Aniline has no heavy surface coating, so colour and finish changes show immediately. Spot-test on a hidden area and use the thinnest coat that works. |
| Corrected-grain leather | Yes, with limits | A heavy surface coating limits absorption. Renovateur will clean and soften the surface, but it will not penetrate as deeply as on full-grain leather. Do not keep adding coats hoping for deeper penetration. |
| Suede | No — use the spray, not the cream | Cream gets caught in the nap, darkens it, and ruins texture. See suede brush. |
| Nubuck | No — use the spray, not the cream | Same reason as suede. Nubuck nap is finer and even easier to ruin with cream. |
| Patent leather | No | Patent has a hard, coated surface. Cream does not penetrate it, and it can dull or damage the coating. Clean patent with a damp cloth only, as per standard patent care. |
| Fabric, canvas, synthetics | No | Renovateur is for smooth leather only. Canvas totes and fabric shoes need their own care, not leather cream. |
| Exotic leathers (reptile, etc.) | Do not assume | Saphir makes specific products for some exotic leathers. Do not assume Renovateur cream is suitable for reptile or other exotic skins without checking Saphir’s guidance for that specific leather. |
| Soles | No | Renovateur is for uppers and leather surfaces, not for soles. Do not condition soles with it. |
If you are unsure what leather you have, find out before you apply anything. A cream that is perfect for box calf can ruin suede, and a spray that is perfect for suede will do nothing useful for smooth leather. The product name alone does not tell you which one you need — the leather type does.
The Full Routine Order — Where Renovateur Fits
Renovateur is one step in a routine, not the whole routine. Here is the full order, so you can see where it sits and what comes after it.
- Brush — horsehair brush, dust and surface dirt off.
- Clean, if needed — if the item is dirty or clogged with old wax, silicone, or resin, clean it with Reno’Mat / Reno Cleaner first, let it air dry, and brush again. If it is regularly cleaned and well maintained, you can skip this step.
- Renovateur — thin coat, dry at least 3 minutes, buff. This cleans gently, conditions, and opens the pores.
- Pigmented cream, if you want colour — Saphir Crème 1925 or Pommadier, matched to your leather colour, to refresh colour and add nourishment. This is the step that restores colour. Renovateur alone does not.
- Wax polish, if you want shine — Saphir Pâte de Luxe for a shine, or Mirror Gloss for a mirror shine / glaçage. These contain harder waxes and are for shine, not conditioning.
- Protector, if you want protection — a separate protector product, if your routine includes one. Renovateur alone does not protect, as Section 10 explains.
You can stop at step 3 for a soft, natural finish. Many people do, and their shoes and bags look great. Steps 4 to 6 are optional, and each one adds something specific: colour, shine, or protection. Do not skip Renovateur and go straight to wax polish, or the wax will sit on top of dry, dirty leather and will not last. Do not apply Renovateur after wax polish and expect it to penetrate — wax seals the surface, and Renovateur needs open pores to work.
For a dress-shoe version of this routine, with the same order and the same logic, see dress shoes.

How Often, and Over-Conditioning — The Frequency Question
Guides give wildly different frequencies, and they are all answering different questions:
- Every polishing session, about once a month — ShoeTree Project’s rule, for shoes that are worn regularly and polished regularly.
- Every fifth or sixth time you clean and polish — CareOfCarl’s rule, for shoes that are cleaned often and do not need conditioning every time.
- Every 3–6 months, after stripping — MK Library’s rule, for dress shoes where excess wax is stripped with Renomat, then Renovateur conditions, then the shine is rebuilt.
- After cleaning agents or getting wet — every guide agrees on this one. Cleaning agents and water strip oils, so always follow them with Renovateur once the item is dry.
The honest answer is: condition when the leather needs it, not on a fixed calendar. Signs it needs conditioning: dryness, stiffness, dullness, fine creases that feel papery, or a surface that absorbs a spot test instantly. Signs it does not need it yet: suppleness, even soft shine after buffing, and a surface that does not absorb cream quickly.
Over-conditioning — what too much looks like:
- Greasy, sticky residue that does not buff out.
- A surface that attracts dirt and dust, because excess cream sits on top.
- Softening beyond suppleness — leather that feels limp or loses shape, especially on bags and jackets.
- Darkening, especially on light leather, from repeated heavy coats.
If you see any of those, stop conditioning, buff thoroughly with a clean cloth, let the item air dry, and wait before the next coat. More cream is not the fix for too much cream.
For bags, over-conditioning is a particular risk on handles and corners, where repeated heavy coats build up fastest. Thin coats, fully buffed, are always safer than thick coats left to sit.

Mistakes to Avoid — The Complete List
- Using the cream on suede or nubuck. Use the spray instead, or the suede routine. See suede brush.
- Using too much product. Start pea- to dime-sized, spread wide, add small dabs only. Excess cream stays sticky and attracts dirt.
- Skipping cleaning. Dirt and old wax trapped under conditioner become a dull layer and stop oils from penetrating. Clean first if the item is dirty or clogged.
- Skipping the spot test. Especially on light colours, aniline, and vintage leather. A hidden-area test takes a minute and saves a visible mistake.
- Using Renovateur as a stain remover. It is a conditioner with mild cleaning action, not a stain remover. Stubborn stains need a proper cleaner first, and some stains will not come out with conditioning at all. Repeatedly rubbing a stain with Renovateur will not lift it — it will just work cream into the stain.
- Expecting colour restoration. Renovateur is pigment-free. It will not restore lost colour. Use a pigmented cream after it if you need colour.
- Expecting waterproofing or protection. Renovateur alone does not protect leather. You need a follow-up cream and, if you want water protection, a protector product. Stridewise’s roundup makes the same point: Renovateur is not great for waterproofing on its own.
- Heat or sun drying. Do not use a hairdryer, radiator, or direct sunlight to speed drying. Heat dries leather out.
- Wearing or using the item before buffing. Unbuffed cream transfers to socks, clothes, hands, and anything the item touches.
- Applying over wax build-up. Wax seals pores. Strip excess wax first, then condition, then rebuild shine. Otherwise Renovateur sits on top and does nothing useful.
- Applying to hardware, lining, or soles. Renovateur is for smooth leather surfaces only. Keep it off metal, zippers, chains, lining, and soles.
- Spraying perfume or other chemicals onto leather. Perfume, hairspray, and similar products contain solvents that can mark leather. Apply perfume to skin or clothes first, let it dry, and keep it off leather goods. For choosing a scent to wear separately from your leather care, see Glossier perfume.
- Assuming conditioning proves authenticity. Conditioning a luxury item does not make it genuine, and a well-conditioned fake is still a fake. The same logic applies to watches: a serial number alone does not prove a watch genuine, and conditioning alone does not prove a bag genuine. For the watch version of that principle — what a serial check can and cannot prove — see serial number check. For the physical checks that do matter on a Rolex, before you spend money conditioning or buying one, see fake Rolex.

Frequently Asked Questions
Will Saphir Renovateur change the colour of my leather?
No. It is neutral and pigment-free, so it will not change colour. It may make leather look slightly darker while wet, which is normal and usually settles after drying and buffing. If you want to refresh or change colour, use a pigmented cream after Renovateur.
Can I use Renovateur on suede?
No, not the cream. Use the Renovateur spray made for suede and nubuck, or follow a suede-specific routine. See suede brush.
Can I use Renovateur on patent leather?
No. Patent has a hard coated surface that cream does not penetrate. Clean patent with a damp cloth only.
Can I use Renovateur on bags and jackets, or only shoes?
Yes, on any smooth leather bag, jacket, belt, or accessory, following the same method, with the bag and jacket warnings in Section 7. Do not apply it to hardware, lining, or non-leather parts.
How much Renovateur should I use?
Start with a pea- to dime-sized amount, about 1–2ml, spread it wide first, and add small dabs only until one thin, even coat covers the item. A 1cm dab covers almost half a shoe. If uptake slows and the surface feels slightly sticky, stop — the leather is thoroughly conditioned.
How long should I let Renovateur dry?
At least 3 minutes before buffing, as Saphir instructs. Longer is better for dry leather — 30 minutes is sensible for a first coat on very dry leather, and overnight is optional, not required. Never use heat or direct sunlight to speed drying, and always buff before wearing or using the item.
Does Renovateur waterproof leather?
No, not on its own. It conditions and gently cleans, but it does not offer protection. Always follow it with a cream polish if you want protection and shine, and use a separate protector if you need water protection.
How often should I use Renovateur?
When the leather needs it: about once a month for regularly worn and polished shoes, less often for items that are cleaned frequently, and always after a cleaning agent or after getting wet, once the item is dry. Condition on condition, not on a fixed calendar, and watch for over-conditioning signs in Section 10.
Final Verdict
Saphir Renovateur earns its reputation, but only if you use it for what it is: a thin, neutral, water-based conditioner for smooth leather, used as one step in a routine, not as a miracle product.
Buy the cream for smooth leather, buy the spray for suede, spot-test first, use a thin coat, dry at least 3 minutes, buff thoroughly, and follow it with a pigmented cream if you need colour and a wax polish if you want shine. Do that, and your shoes, bags, and jackets will stay supple, softly shining, and free of the sticky, greasy layer that comes from using too much, too often, on the wrong leather.
And remember the three myths that cause most Renovateur disappointments: it will not restore colour, it will not remove stubborn stains, and it will not protect leather on its own. Once you drop those three expectations, Renovateur does exactly what it promises — it keeps good leather good, for a long time.